

Troubleshooting
Troubleshooting Before You Repair
To save you time and money, it is often good to do a little troubleshooting before sending your equipment in for repair. Of course it’s important not to disassemble or open a device when doing so. This often leads to more costly repairs if something gets broken.
This page will provide you with a few steps to follow, which will hopefully get you quickly back on the field.
If none of the following help with your issues, you can send your unit to us by clicking on the repair link at the bottom of this page, or on the top menu bar.
Pipe Inspection Cameras
*Please click on a Category to view more information
General Troubleshooting
No video, lights, or audio when recording? Sonde not locating? Counter off? You may find something here to help you in the field! But, before you begin…
PLEASE DO NOT DISASSEMBLE COMPONANTS OF YOUR UNIT. THAT WILL ADD MORE TO THE COST OF REPAIR IF NEEDED.
- Check all connections between the camera head and the controller/monitor. Make sure nothing is broken or loose.
- Is your camera head securely tightened to the spring?
- Is the spring securely tightened to the pushrod cone?
- Is the pushrod securely tightened to the reel?
- Is the Reel to Monitor Cable (RTM) securely tightened to both the reel and the monitor?
- Check your Controller/Monitor Settings.
- If the counter is off, is the reel-type set correctly?
- If there are no lights, are they turned up/on?
- If the sonde isn’t working, do you have the correct frequency option selected?
- Update/Reinstall the Firmware. Believe it or not, this can fix a lot of issues. We have seen updating/reinstalling fix video, lights, audio, recording, the counter, and even battery charging issues.
- Please refer to the “How Do I Update Firmware?” section on this page.
- Swap your Reel To Monitor Cable. Cables become weak where they bend frequently, and cable end connectors are often the culprit for many issues.
- Swap your Camera Head. If you have a spare head, swap it with the one on your troubling reel. Your narrowing down that issue can save you labor costs. Some manufacturers (Vivax-Metrotech) offer exchange programs.
- Ensure your equipment is compatible with each other.
- If there is no video, are you using an HD Camera Head with a non-HD capable controller/monitor?
- If you aren’t able to locate, are you using a locator set to and capable of receiving the broadcasted frequency?
- Call for support @ 1-800-519-1998. If you have any issues with the above, we would be happy to help.
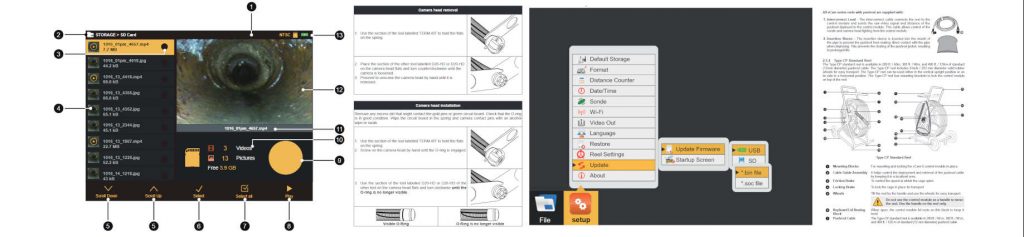
How Do I Update Firmware?
If the manufacturer of your unit provides firmware, you can usually find it and the installation instructions on their website. These instructions will focus on Vivax-Metrotech’s vCam series controllers. The process should be similar for other brands. You can grab your Vivax-Metrotech files under the Firmware section here.
- Identify the model of your controller/monitor.
- On Vivax units, this is printed on either the outside of the keyboard door panel, or next to the control buttons.
- Download the instructions and latest firmware files for your unit.
- For Vivax-Metrotech, you can get all of this here.
- Unzip and copy the firmware file(s) to the top directory of your USB drive.
- The MX files will end in “.mxip”
- The vCam-5 and vCam-6 files will end in “.bin” and “.soc” (there are 2 files).
- Be sure the files aren’t in a folder of your thumb-drive, or they won’t appear in the Update file list.
- Eject your USB drive and insert it into your monitor.
- After your USB drive has been recognized by your monitor:
- For vCam-5 and vCam-6:
- Press the F10 Menu key twice to bring up the “setup menu”.
- Use the Down arrow key to scroll down to the “Update” selection.
- Use the Right arrow key to bring up choices of “Update Firmware” or “Startup Screen”.
- Use the Up/Down arrow keys to select USB and press the Enter key . This should show the USB Thumb Drive which is plugged into the control module. Press Enter.
- Use the Up/Down arrow keys to select either the “.bin” or “.soc” file and press Enter.
- The file name, with extension, will be highlighted in yellow. Press enter.
- This will show a message box asking, “Do you want to upgrade the file xxxx”; press Enter to begin the upgrade. A status bar should appear showing time remaining. IMPORTANT: DO NOT INTERRUPT THE UPDATE AFTER IT HAS STARTED.
- When the upgrade is finished, the system will reboot itself. The system must reboot in order to finish the update.
- . Repeat these steps if you need to update both the “.bin” and “.soc” file, to upgrade the next file if needed.
- Verify that the firmware update was successful by checking the firmware version again. You can find this in the “About” screen of the setup menu by pressing F10 twice and scrolling to the bottom of the page.
- For the MX and MX-2:
- Using the onscreen menu along the bottom of the screen, select “Setup”, then “System”. This should take you to the firmware screen.
- Select the file ending in “.mxip”.
- Select “Update”, and allow the unit to reboot a few times if it needs to.
- Verify the version number has changed on the firmware update screen.
- For vCam-5 and vCam-6:
- Identify the model of your controller/monitor.

Why Does My Equipment Go In for Repair So Often?
The causes for repair we generally see are due to age, weathering/improper storage, and not using finesse while inserting or removing pushrod (especially when in a hurry or when trying to maneuver in tricky pipes).
Here are some things you can do to help keep your equipment in good shape:
- When inserting pushrod into a pipe, go slow and keep your rod from bending between your hands and the entry point as much as possible. Kinks are often a result of pushing forward too fast at an angle.
- Do the same when putting your rod back into the reel, for the same reasons.
- If your camera gets stuck in a pipe while pulling it out, try slowly pushing it in a few inches to give it slack, and slowly pulling it back out. Try this a few times, it may “unhitch” itself. Pulling the camera harder when it gets stuck can cause a slice into the rod’s wiring or break the fiberglass core.
- Pushing slow and steady will reduce the chance of damaging the camera head. Heavy impact can cause cracks in the lens or seal, allowing moisture in. Or it can knock out the lights and video.
- Don’t store your pushrod out in the elements. Between the Sun’s UV rays and the rain, a lot of damage can be done to your equipment. Store it in a dry place out of the sun, when not in use.
- Don’t overstress your Reel To Monitor cable connectors. A sharp bend too many times can break the wires and cause any issue. Every signal passes through that cable, to and from your controller.
Hopefully this helps you keep your equipment in shape!
Transmitters & Receivers
*Please click on a Category to view more information
Updating Your Firmware
Often, updating firmware will fix issues you may be having. Before sending your unit in for recalibration or repair you may want to give this a try. If the manufacturer of your unit provides firmware, you can usually find it and the installation instructions on their website. These instructions will focus on Vivax-Metrotech vLoc and VM series Receivers and Transmitters.
To get the latest Software, Firmware, and Vivax-Metrotech support documentation. Click on the button below!
If you have any questions, feel free to contact Instrument Technology Corporation at 800-519-1998.